Implementing a Web Frontend Interview System: Part 1 - Design
Introduction
Recently, during interviews, I noticed that there doesn't seem to be a particularly user-friendly frontend interview system available (or maybe I just haven't come across one). So, I had an idea, why not implement one? Let's get started...
First, do some research
Based on my experience and research, there are two main ways for conducting web frontend interviews online: one involves candidates sharing their computer desktop through an IM tool for the interviewer to observe their answers, and the other uses general programmer interview websites like LeetCode. Each method has its pros and cons.
1. Sharing desktop via IM tool.
The advantage of this method is that the interviewer can intuitively observe the candidate's answer process, making it convenient to assess the candidate's skill level. Candidates can also use their familiar development environment. However, the drawback is that the interviewer cannot get real-time access to the candidate's code or its execution, making it challenging to assess code quality. Additionally, because desktop sharing doesn't allow for video, it hinders smooth communication and makes it difficult to determine if the candidate is cheating. Moreover, this method requires candidates to download software in advance, resulting in higher preparation costs and communication challenges. Lastly, due to privacy concerns, many candidates are unwilling to share their desktops.
Improvements needed for this method include real-time code synchronization and simultaneous desktop sharing and video calling capabilities. However, implementing this through an IM tool is difficult.
2. Using general programmer interview websites.
The advantage of this method is that audio and video calling services are smooth, and there are question banks for interviewers to choose from. However, these websites do not support online code editing and execution, making it challenging for candidates to showcase their true abilities, and for interviewers to effectively assess their technical skills.
Improvements needed for this method include the ability for online code editing and execution.
Define the requirements
Implement a web frontend development engineer interview system that not only features video calling but also allows collaborative code editing between the interviewer and the candidate, and the ability to execute code online. This can significantly improve interview efficiency and enhance the accuracy of the interviewer's assessment of the candidate.
Requirements analysis
(I) User role analysis
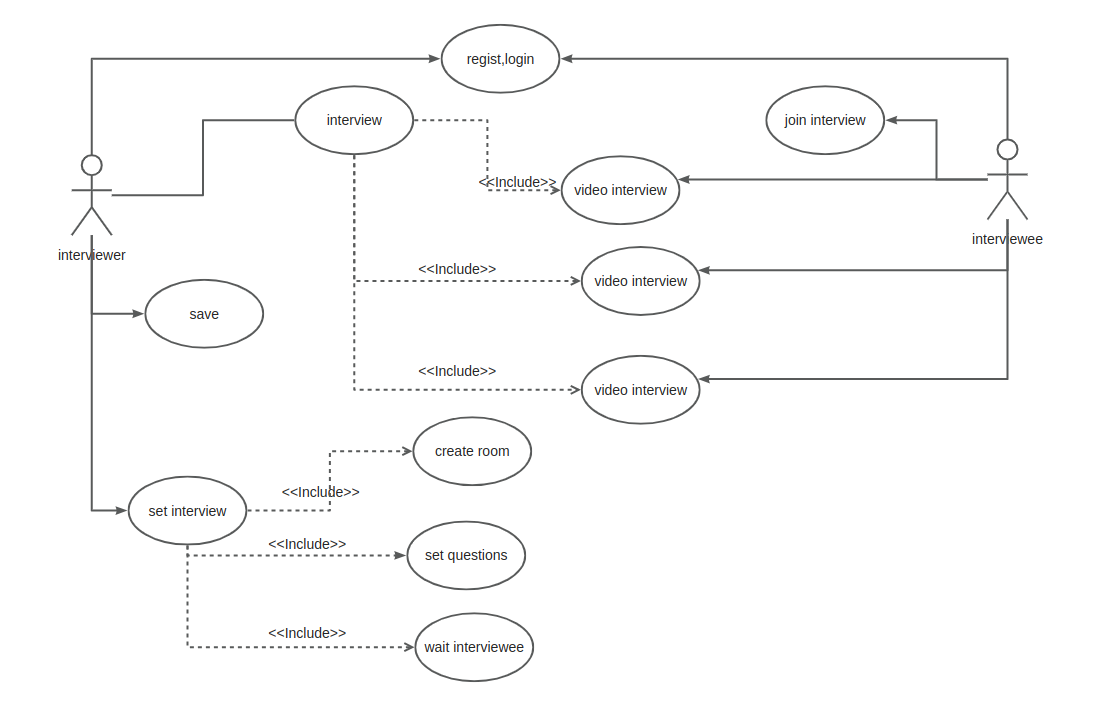
This system supports user registration and login, and after logging in, it distinguishes between interviewer and candidate roles during interviews. Here's a UML use case diagram:

(II) Interview process analysis
Let's go straight to the process diagram, take a look for yourselves:

(III) Functional requirements
1. User registration and login functionality
Functionality for users to register for a system account and log in with a username and password.
2. Collaborative code editing functionality
During interviews, both the interviewer and candidate can edit code simultaneously, and the system will automatically sync their editing results to both editor interfaces.
3. Online code execution functionality
The ability to execute edited code online and print execution results.
4. Video calling functionality
Initiate video calling requests between the interviewer and the candidate, and conduct video interviews.
5. Code saving and retrieval functionality
After an interview, save the code from that session for future reference.
Designing system architecture
After analyzing the requirements, it seems a bit complex. After careful consideration, the system architecture should look like this:
(I) System architecture
The system is divided into two parts: web frontend and web backend, communicating via HTTP and WebSocket.
The frontend is a single-page application; it primarily uses TypeScript, webpack as the packaging tool, React.js as the framework, and handles routing with react-router and react-router-dom. MobX is used for data management, and antd is used for UI framework to build the system structure. Based on these frameworks, business logic code is written for each module, along with UI and interactions.
The backend is a Node.js application, using MySQL as the database. It mainly uses NestJS as the framework, passport for authentication, sequelize as the ORM framework, ws for WebSocket, and yjs and y-websocket for document collaboration. Four basic services are established: user functionality service, interview functionality service, authentication functionality service, and event handling functionality service. Let's draw an architecture diagram:

(II) System module division
The system is mainly divided into user registration, login, and verification modules, and interview modules.
1. User registration, login, and verification module
(1) Functionality for user to register a platform's account .
(2) Functionality for user to login system.
(3) Authorization validation for various user operations.
2. Interview module
(1) Functionality for users to view past interviews through an interview list.
(2) Users acting as interviewers can create interviews.
(3) Users acting as candidates can join interviews.
(4) Collaborative code editing between candidates and interviewers.
(5) Video calling functionality between candidates and interviewers.
(6) Text communication functionality between candidates and interviewers.
(III) Database design
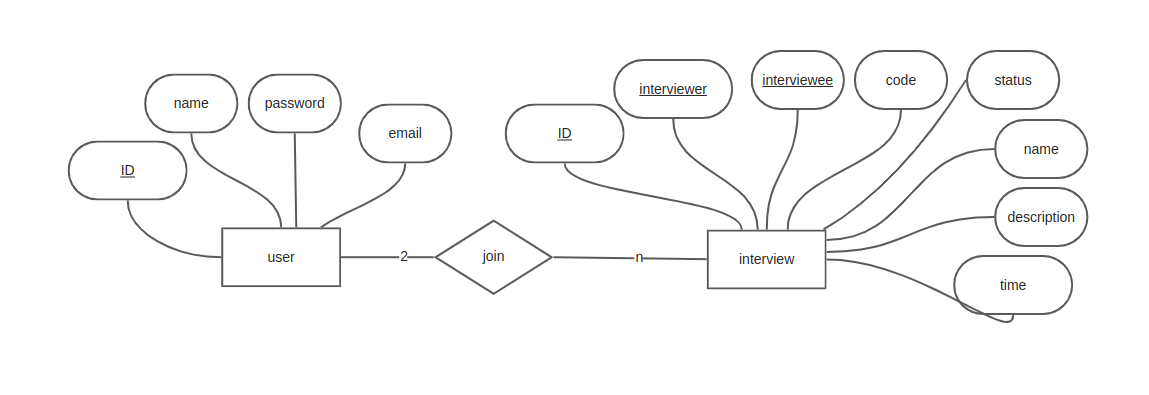
The database is quite simple, with two tables: user table and interview table.
(1) The user table includes ID (primary key), name (username), password, and email fields.
(2) The interview table includes ID (primary key), interviewerId (foreign key, interviewer), intervieweeId (foreign key, interviewee), code (code edited by the user), name (interview name), info (interview description), and time (interview time). Let's draw an ER diagram:

Designing System Features
1. User Registration, Login, and Verification Module
(1) New users entering the platform are automatically redirected to the login/register page. Users input their username and password, click the register button for registration. After saving user information in the database, the frontend redirects to the user's homepage.
(2) Unlogged-in users entering the platform are automatically redirected to the login/register page. Users input their username and password, click login, and the backend verifies login information and returns a token to the frontend. The frontend saves the token and redirects to the user's homepage.
(3) During various operations, the backend validates the token. If validation fails, it returns a 401 status code, and the frontend redirects to the login page.
2. Interview Module
(1) On the user's homepage, the left side displays interviews the user has participated in. There are two tabs, showing interview lists where the user acted as an interviewer and as an interviewee. A pagination component is below each list.
(2) Clicking on an interview entry in the list takes the user to the interview page, where they can review interview details or rejoin the interview.
(3) On the right side of the user's homepage, a "Create Interview" button is displayed. Clicking it opens a dialog to create an interview. After entering the interview name and description, clicking the confirm button creates an interview and takes the user to the interview page, where the user becomes the interviewer. Clicking cancel closes the dialog.
(4) Interviewers can enter the interview page, edit code, and enter interview questions in the code editor, waiting for interviewees to join.
(5) On the right side of the user's homepage, an input field for Interview ID, a explanation input field, and a "Join Interview" button are displayed. After entering the Interview ID and request explanation, clicking the "Join Interview" button sends an interview request to the interviewer and waits for a response.
(6) The interviewer, waiting for interviewees to join, receives an interview request, and a popup appears on the page. The interviewer can click "Agree" or "Disagree" and responds accordingly. If agreeing, the system adds the requesting user as an interviewee.
(7) The interviewee, upon receiving the interviewer's agreement response, enters the interview page. If a disagreement response is received, a notification informs the user that the interviewer did not agree to their participation.
(8) When both the interviewee and interviewer are in the interview, the video call button on the interviewer's page changes from grayed out to highlighted. Clicking the button opens a video connection to start the video interview.
(9) Both interviewees and interviewers can input text in the chat box, click send, and engage in text communication.
(10) When the current video connection is disconnected, the interviewer can click the video call button to initiate a new video call.
(11) During the interview, both interviewees and interviewers can input code into the code editing box. The system automatically synchronizes the edits and cursor positions. Both parties can click the save button to save code to the database at any time.
(12) After the interview concludes, the interviewer clicks the "End Interview" button to conclude the interview.
This is the design part. NEXT:go to part2-coding
